Playlist of previous week audio examples:
- World War II On The Air, Sourcebooks Mediafusion
- Leaving Las Vegas, original motion picture soundtrack
- Masque of the Red Death, read by William Burroughs, iSCAPE/Warner
- Bladerunner (Vangelis edition), Warner
- Act II from Improvement by Robert Ashley, Elektra Nonesuch
General rules for good production sound:
1. Scout your locations.
2. Check make sure you equipment is in working order. If you are not
familiar with the equipment, practice using it.
3. During the shoot, use dry runs/rehearsals to set levels and figure
out boom placement and movement.
4. Boom overhead if possible and get the microphone as close as possible
to the talent. This will reduce reverb and background noise.
5. Focus on the dialog to the exclusion of all other sounds. The dialog
tells the story and is the hardest sound element to replace in post.
6. Don't hesitate to notify the director if you feel that the sound
is in any way problematic. Have him/her listen to the sound on headphones.
7. In the same way one would make setup adjustments for picture, one
should also consider making setup adjustments for sound.
8. Make sure one can clearly read the information on the slate and make
sure to voice slate all the shots. (This is vital for syncing dailies).
9. Have the director wait a few seconds before calling "action"
so that you can have some clean usable room tone for dialogue editing
at the head of each shot.
10. Monitor levels from the meters and make sure you have good levels.
On a DAT or mini-disc the levels should average around -10db. -4 db
on Nagra.
11. No matter how wide the shot is you should place the microphone as
close as possible to the talent. Any sense of perspective (reverb or
appropriate levels) will be dealt with at the mix.
12. Whenever possible, replay and listen to the sound.
13. If you have no choice but to record in a noisy or reverberant space,
make sure you get wild lines from the actors in a quiet location. This
avoid time consuming studio ADR.
14. Label all your tapes clearly.
Remember: There is no miracle fix in post. Garbage in, garbage out.
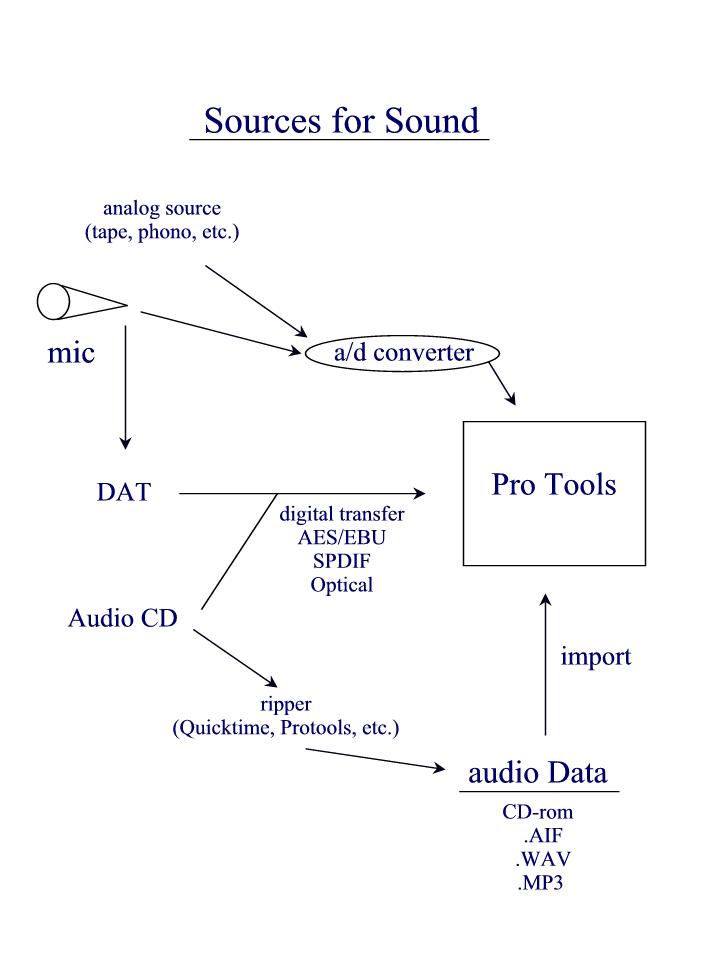
Getting Ready to Record
- Setting Record Modes
- Record enabling tracks
- Setting Audio Input Levels
- Monitorying Audio
- Minimizing Latency
- Allocating Hard Drives
- Allocating drive space
- Recording to a click
Recording and Playing Back Audio
- The transport window
- recording audio tracks
- punch-recording audio
- using quick-punch
- loop-recording audio
- auditioning takes
- recording to playlists
- recording from digital source
- playing audio tracks
Managing Audio Files
- Locating audio files
- importing audio
- setting sample rate/quality
- importing tracks
- exporting audio
- compacting and deleting audio files
- transferring audio from CD
- backing up your files
Report due next week describing
the audio design of a movie or video game of your choice,
Select a 2 minute segment, intro, scene or game level, and describe
every sound that is being heard by the audience. Report should be
around three pages, typed.
It should cover the following topics:
-
music; what style, what instruments or sounds, score or source
-
sound effects; real or abstract
-
dialogue; coming from the actor(s), off-screen, or narration
-
sound design; how many layers can be percieved, simple or complex, emotion
-
use; how clear or mixed are the sounds, how accurate is the synchronization
-
success; how appropriate are the sounds, the overall effect, the quality in your opinion
Discuss what the director or producer was trying to attain with the sound design. Also, what do you think the sound editor had to work with to attain this final result?