Composition of a Web Page
Web pages are defined by text documents that describe the contents and layout of the page. These text documents are written in a mark-up language called HTML (HyperText Markup Language). The HTML contains formatting information for the page, and includes the "live" text part of the page (i.e. text that has not been rendered in a graphics program like Photoshop). Any images, audio, video, Flash files, or other contents are specified in the HTML, but are not included in it. These files are stored separately, either in the same directory with the HTML text file, or sometimes on a completely different computer.
As a result, web pages are a bit fragile, and the designer must take care to keep the HTML files and images together. For example, if the images are moved to a different location in relation to the HTML, those links will be broken, and the images won't display.
A web page is composed of the following elements:
- The HTML file, which describes the page layout, defines links to other web pages, and contains the text for the page
- Elements that come from the same server, or a different server
- Image files (.gif, .jpg, .png)
- Audio files (.mp3, .au, .ram, .mov)
- Other multimedia objects (QuickTime movies, Flash, etc.)
- JavaScript
Introduction to Dreamweaver
Dreamweaver is an application for creating web pages. All web pages are simple text files that use HTML (and sometimes JavaScript ) to describe the page. HTML (HyperText Markup Language) is a standardized language that can be viewed with any web browser or other web page application (e.g. GoLive or PageMill).
Because web pages are made up of HTML, Dreamweaver does not create special Dreamweaver files. On the PC, you may find that if you double click on .html files, they will open in Explorer or Netscape rather than Dreamweaver. As a result, it's best to open your .html files from within dreamweaver.
Dreamweaver is just a page formatting application, and is not capable of creating any media elements other than text. You must use Photoshop, Peak, or other applications to create images, sounds, etc.
Launcher. This window is used to launch the other Dreamweaver windows.
Document Window. This window shows you what the web page will look like - more or less. It is also the place where you can place text, images, and other elements. Any changes you make here will be automatically reflected in the HTML Window.
HTML Inspector. This window shows the raw HTML. You can write HTML directly in this window, and any changes you make will be reflected in the Document window when you switch to the document window, or perform a Save (control-s for PC or command-s for mac).
Properties Inspector. This window is one of the most important and is used to show and set any properties of the currently selected element (image, table, text, etc.). For example, when you have some text selected, you use this window to set the bold style and font size.
Object Palette. This small palette window is a shortcut menu used to place items into the current web page. For example, click on the first icon at the top of the object palette to place an image in the document (at the current insert location).
Site. This window servers two main purposes. First, it shows the way files are organized in your web site, and allows you to open files without using the File>Open dialog. Second, it is an FTP (File Transfer Protocol) client, which enables you to transfer your HTML files from the computer where you create them, to the web server where the files will be visible from the Web.
To create a new web page in Dreamweaver, do the following:
-
Select FILE>NEW
- Immediately save the file in a good location on your disk before you do anything else. This is because many web page features (such as showing images) rely on links to other files. These links only make sense in terms of where the web page is in relation to the linked file. Select FILE>SAVE, and browse to the location on your disk.
- Give the file a name. This name should be all lower case, and have no spaces between words.
- SAVE the file
Dreamweaver is a WYSIWYG (what you see is what you get) authoring tool, and you can see how your web page is going to look in the Document window. But it is not perfect or complete in the way it displays web pages. As a result, you must preview your web pages in a real web browser such as Netscape or Explorer. When you have a page to the point where you want to check how it looks, save your file, then select FILE>PREVIEW IN BROWSER>NETSCAPE (or Explorer). Alternatively, you can simply press the F12 function key.
You may need to configure the Preview function if browsers have not been set up in your version of Dreamweaver. To do so, select FILE>PREVIEW IN BROWSER>EDIT BROWSER LIST, and Add a browser by finding the browser on your hard disk.
Every web page has global properties that can be set in the MODIFY>PAGE PROPERTIES... menu. Important properties to be set are the:
- Title. This text does not appear in the body of the document. It sets the text that will be displayed in the top bar of the browser window. You can also set the page title in toolbar of the document window.
- Background Image. This optional property allows you to use an image as a repeating, tiled background for the entire page.
- Background Color. If this property is not set, the background color of the web page will be gray (although some web browsers will display it as white). Set this property to control the color of the background.
See pages 20-24 of the Quickstart Dreamweaver book for more details.
Text formatting in Dreamweaver is similar to the formatting available in a word processor. You select the text you wish to modify, and then apply a style to it. For example, to make a word bold, select the word, then click on the "B" button in the Property Inspector. Alternatively, you can select the text, and use the Text pull-down menu (e.g. Text>Style>Bold).
Text characteristics can be set by Dreamweaver, including bold, italic, color, size, font, and justification. In addition, Dreamweaver offer that ability to check the spelling of either the selected text, or the entire document (TEXT>CHECK SPELLING).

You will find that if you type in some text, and then press the Enter or Return key, a blank line will be automatically put after your text. If you wish to have the next line of text appear right after the previous text (with no blank line), then hold the SHIFT key down while pressing Enter or Return.
See chapters 3 & 4 of the Quickstart Dreamweaver book for more details.
You can create a link to another web page (a page you've made, or one on another web site) so that when a person clicks, the browser will open that new page.
- To do this, select the text or image that you want to be the link.
- Then, in the Property Inspector, type in the link in the Link section.
- If the page you are linking to is on another web site, you must specify the complete URL, including the "http://" part (e.g. http://www.smc.edu/).
- If you are linking to another page on your site, you can type in the file name (e.g. file.html), or click on the yellow folder button and select the file from the open dialog.
See chapter 6 of the Quickstart Dreamweaver book for more details.
Web pages are usually a combination of text and images, and Dreamweaver allows you to place, adjust and to a limited extent, set the layout of images on the page. Keep in mind that HTML is not a page layout language but rather a page markup language, so you may find yourself being frustrated at your lack of ability to position images exactly on the page.
The simplest way to get images for use in making web pages is to "steal" the images from other web pages. This approach is only for learning purposes, and you must not use this method for commercial purposes since this would violate the rights of the copyright owner of the image.
To steal an image from a web page, place the cursor over the image, and right-click (pc) or control-click (mac). A menu will pop-up, and you can select "Save Image As...". Browse to the location on your disk where the web page is, and save the file in the same location as the web page. Here are some images to use for this exercise, one is a JPEG, and one is a GIF file.
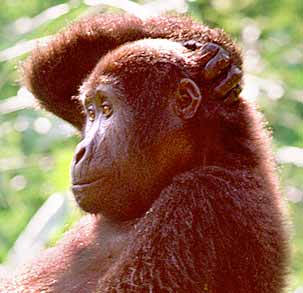 gorilla.jpg |
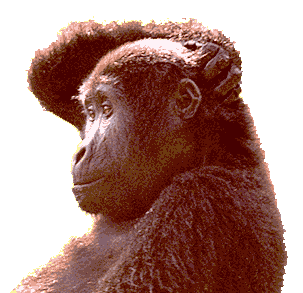 gorilla.gif |
Once you have an image to work with, these are the steps for putting an image in a web page.
- Placing an image. To place an image on a page, first, place your cursor and CLICK in the location on the page where you want the image to show up. Then, click on the top icon in the Objects palette. It will request the name of the image, which you can use the open dialog to set. Once the image is displayed on the page, you can set it's characteristics in the Property Inspector.
- Adjusting the size of the image. Click on the image to select it. Then you can change the displayed size by clicking and dragging the small black squares that appear on the edges of the image when you select it.
- Making an image a link. Click on the image to select it. In the Property Inspector put the link in the Link section. You may also want to put a zero in the Border section to prevent the blue line that will appear around an image to indicate it is a link.
- Flowing text around an image. By default, text does not flow nicely around images. To enable text flowing, select the image, and then set the Align setting to Left or Right. This will place the image on the left or right of the browser screen, and text will flow around it. You may need to reposition the image to get text to flow around the image at the point you want.
- Adjusting the margins around an image. When text flows around the image, it "hugs" the image very closely by default. You can increase the margin around the image by adjusting the horizontal and vertical spacing. Select the image, and then put the number of pixels of space you want in the Vspace and Hspace sections of the Property Inspector.

See chapter 5 of the Quickstart Dreamweaver book for more details.
GIF89a Format
- Best for - Graphic images with large areas of a single color, images with transparency, images with sharp edges, images with few colors.
- Transparency - Defines one color to be transparent
- Quality and size in the image are primarily controlled by setting the number of colors in the image
- Interlacing - A way to encode the image so that when a small amount of the image has been downloaded, it can be displayed in rough form. The image becomes progressively more clear until the whole image is downloaded.
JPEG Format
- Best for - Photographic images, complex images, images with soft edges, large images.
-
Quality in the image is controlled by the quality setting when you save a JPEG image. The lower the number, the worse the quality.
- Progressive - A format similar to interlacing for GIFs that displays the image with increasing quality as it downloads. The progressive format is not supported by some older browsers.
To make a GIF, do the following to an RGB image:
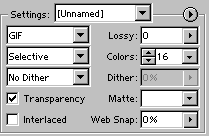 Show and hide any layers to get the image you need
- Select FILE>SAVE FOR WEB...
- Click on the Optimized tab at the top left. And at the bottom left of the screen, the size of the compressed image is shown. Keep track of both of these as you adjust the various settings. Keep in mind that the total size of a web page including all of its images should be less than 60K.
- Select GIF 32 No Dither from the Settings pull down. This will provide a good starting point for your settings.
- Choose SELECTIVE for the palette selection method. SELECTIVE is the default and will usually provide good results.
- Select NO DITHER. This will produce the smallest files, while the other Dither options may improve the image quality. If Dither is needed, you may want to consider JPEG for the image format.
- Select the smallest number of colors that produces an acceptable looking image.
- If you have created a mask for transparency, and want the background of the web page to show through the mask area, check the TRANSPARENCY box.
- If you are using transparency, select a MATTE color. This color selection affects the color of the anti-aliasing fringe used at the boundary between the image and the transparent areas. E.g. if your image will be displayed on a white web page, select white as the MATTE color to make a clean, anti-aliased edge for the image.
- If you want the image to display while downloading, select the INTERLACED checkbox.
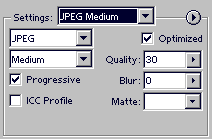 Show and hide any layers to get the image you need
- Select FILE>SAVE FOR WEB...
- Click on the Optimized tab at the top left. And at the bottom left of the screen, the size of the compressed image is shown. Keep track of both of these as you adjust the various settings. Keep in mind that the total size of a web page including all of its images should be less than 60K.
- Select JPEG Medium from the Settings pull down. This will provide a good starting point for your settings.
- Check the OPTIMIZED checkbox. This makes the file size smaller, and is compatible with almost all browsers.
- Experiment with the QUALITY setting while checking the Optimized image for JPEG artifacts and looking at the resulting file size. Usually a setting between 20 - 40 works well. Choose the lowest quality setting acceptable so the file is the smallest.
- If you want the image to display while downloading, select the PROGRESSIVE checkbox.
Reading Assignment:
- Dreamweaver - Online help files & video tutorials