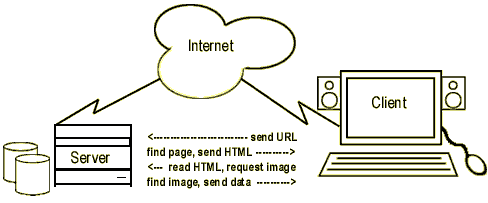
SERVERS
The Server is where the web site files live. The web server software runs on the server machine, responding to people web browsing (on client computers) by sending files back to the client.
- Server software runs on the server machine
- The web site files are on a hard disk attached to the server
- The server software formats and delivers each web page element
- Elements are delivered to many clients at the same time
- A "hit" indicates that one element (not a page!) was delivered (e.g. an image)
- A web page is composed of many elements, therefore each page accessed generates many hits
CLIENTS
The client is the computer where the web page is viewed. The browser software runs on the Client computer and sends requests to the Server computer. When the client receives files from the server, the Client assembles the web page and displays it.
- The web browser runs on the client
- The client requests elements from the server
- It receives and formats the elements delivered by the server
- First reads the HTML
- Formats the page, and displays the text
- Gets additional elements (images, audio, etc.) specified in the HTML
- Displays additional elements
- Manages the interactions with the user (e.g. forms, scrolling, image maps, etc.), minimizing the amount of work the server has to do
Structure of Web Site Files
While there are many different ways to structure the files used in a web site, they should be set up in a clear, organized way. Note that the organization of the files on the server is unrelated to the way the audiences sees the web site--i.e. the placement of a file on the server disk does not affect how the audience navigates to the page.
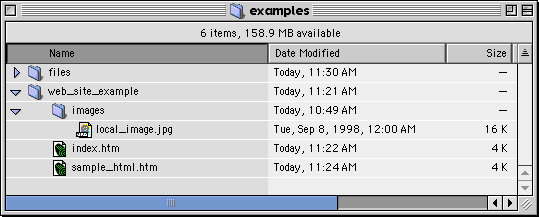
Description of the files in the diagram above:
- files -- This directory contains files that will not be used directly in the web pages. For example, here is where you would put your master photoshop files.
- web_site_example -- This is the folder that contains all of the files for the web site. You should always create a new folder for your web site files first. Only your file web files should be in this directory, keep other files (e.g. Photoshop files) in another folder (e.g. the folder files above).
- images -- This is a directory that contains any images used in your web pages. It is best to create a folder for images to keep them separate from your HTML files.
- local_image.jpg -- This is an image file referenced in the sample_html.htm web page document. Image files must have the proper suffix. JPG (or JPEG) stands for a standard web image type. GIF is the other typical suffix used for images.
- index.htm -- This is file is the first web page that will be seen. Typically, pages that are named index.htm or index.html are displayed by default by the server. Your first page should always be named index.html
- sample_html.htm -- This is another web page document.
- No spaces in the filenames
- Use all lowecase letters
- No special characters in the filenames: For example none of these. "!~:&(," acceptable in web filenames.
- The files MUST have the proper suffix (.html, .gif, .jpg)
Note: You may find that files violating some of these rules work OK in Dreamweaver, or when previewing from the local disk. But files that don't have the proper file names will not work when put up on your web site.
<html>
<head>
<title>Simple HTML Example</title>
</head>
<body bgcolor="#FFFF00">
Some text for a web page that <B>demonstrates</B> the basic form of HTML in a web page.
</body>
</html>
| A cell |  an image with some text in the cell |
| cell | cell |
Tables allow you to control the relative positioning of elements on a page by creating a series of connected cells. These cells can contain text and graphics, and have a specific or relative size specified. You create tables by clicking on the table icon (second one down) in the object palette.
To insert a table:
- Click the cursor at the page location where you want the table
- Click on the second icon in the Object Palette
- In the resulting dialog, specify the number of rows and colums you want
- Set the total width of the table, and set the width parameter to Pixels (rather than Percent)
- Say OK.
- Adjust the size of the table by dragging the cell borders.
Pay attention to the table and cell attributes in the table property inspector. Table properties are accessible by selecting the whole table. Cell properties are accessible by placing the selection point inside a cell - the cell properties will show up in the lower half of the property inspector.
Table properties
- Border
- Cell Spacing
- Cell Padding
- Table Background color
- Table alignment (determines how text wraps around the table)
Cell properties
- Cell Background color
- Cell vertical and horizontal alignment (determines how the cell contents align)
 Table properties
 Table cell properties
Spanning rows or columns
| This cell has a row span of two. | This cell has a column span of two. | |
It's possible to make table cells span rows or columns. The controls for changing these cell attributes are in the lower left hand corner of the table cell properties inspector. To create a span, select the cells you want to cosolidate into one cell, and click on the merge button in the inspector. To remove a span, put the cursor inside the cell to be broken apart, and click on the split button in the inspector.
Flowchart/Navigation Map project due week 14
A navigation diagram or storyboard will be very helpfull with your media design.
Please turn in a copy of your design diagram as a preview of presenting your final project.
Higher grades are given for professionally formatted submissions. This should be considered part of your portfolio.
Reading Assignment:
- Dreamweaver - Online help files & video tutorials