Working with Multi-track audio
- Fade in and fade out
- Cross fade sections or regions
- Mix volume down!
- Duck volume for definition between tracks
- Modify EQ for definition between tracks
- Remember: sound of different frequencies combine best together

A Multi-track session in Audacity
Working with Digital Video
- Fade in from black and fade out to black
- Cross fade between footage; or jump cuts
- Insert longest section of audio first (background music or narration)
- Spot cues with Markers
- Insert music and sound cues to markers; adjust ahead or behind depending on feel
- Point of interest: the brain will try to synch audio with visual!
When you first launch Adobe Premiere you are presented with a window, asking where you would like to start. You can either create a New Project, Open Project or open a recent project if there are any available. If you create a new project you will be taken to the New Project window, where you choose the type of project you would like to work on.
The Interface
In order to edit video efficiently, you must first become familiar with the layout of the basic working windows in Premiere. These windows can be moved about, but most of the time they will be in the default layout.
Premiere's editing interface consists of three primary windows: the Project window, the Monitor and the Timeline. We will need to look a little closer at each of these three windows.
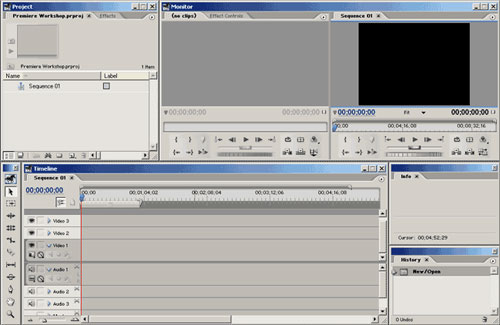
- The Project Window: This is where your media is stored.
- The Monitor: There are two sides to the Monitor: the Source Monitor and the Program Monitor. The Source Monitor is where you preview clips and mark In and Out points in your media. The Program Monitor is where you view your edited film and preview changes you are making.
- The Timeline: This is where your edited work lives, and where most of the basic editing takes place. The basic edit tools are located in the toolbar to the left of the Timeline.
The Project window is where all the media for your project is organized and accessed. Only one project may be opened at a time.
- The Preview pane: When selecting an item from list, information about that file is displayed in the Preview pane.
- File Browser: Contains clips, still images, audio files and all other media associated with your project. This is a basic explorer type window. The view can be changed from details to thumbnails or list view.
The Tools
Once you have material in the Timeline, there is still a great deal you can do with it. This section is going to briefly go over each of the tools found in the the upper left corner of the Timeline. These basic tools are:
![]()
|
Most of the tools have sub-tools that are available by clicking and holding on the main tool itself. These sub-tools provide modifications to the basic tool.
Moving Media to the Timeline
The most basic way to put clips into sequence is to simply drag them from the Project window to the Timeline. You can then move the clips around in the Timeline to organize them as you wish. This, however is usually not very practical, as you will most often only want a part of each clip you have in your Project window.
The more effective way to bring items into your Timeline is to set "In" and "Out" points for a clip in the Source Monitor (you can get a clip into the Source Monitor by dragging it there, or just double clicking on it). Once the clip has its In and Out points set, you can drag it to the Timeline, and only the part of the video between those points will be copied to the Timeline.
Reading Assignment:
- Audacity & Premier - Online help files & video tutorials