|
|
| |
|
|
| |
Many web designers develop their page layouts in Photoshop (or Illustrator)
before they use an application such as Dreamweaver to assemble the page
in HTML. This approach allows the designer to use all of the powerful
layout and design capabilities of Photoshop to work on the creative aspects
of laying out the page. Once a design is solidified, the designer must
translate their Photoshop layout into the realities of HTML and limited
download time. This involves compressing different parts of the layout
in different ways (e.g. some parts will be GIF while others will be JPEG),
and leaving some parts of the layout for live HTML. To do this, it's usually
necessary to cut the original Photoshop image into smaller pieces. This
is called image slicing.
Fortunately, as of Photoshop CS, the image slicing application
is included as part of Photoshop, and tightly integrated.
The slicing tool is specifically designed for the web design image slicing process. Macromedia Fireworks is another program designed
for image slicing.

|
|
| |
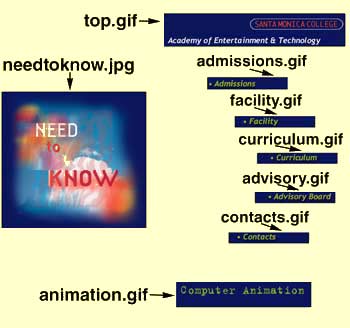
Here's an example web page that demonstrates the image slicing approach. Below is a
diagram showing how the Photoshop image is sliced up to make the files
that make up this web page.

|
|
| |
By slicing the page into smaller graphics, the designer can:
- Compose the page in Photoshop - rather than Dreamweaver
- Simulate layering - by compositing imagery in Photoshop, and
avoiding the use of DHTML layers in the web page.
- Optimize the page - compress parts of the web page individually,
and leave parts of the page "transparent" so the background
color or background image shows through. For example, use JPEG for a
photograph in one part of the page, use 3 bit GIF for a black and white
logo, and use "no_image" for a flat area of color where the
page background color shows through.
- Use live text - leave parts of the page available for "live"
HTML text which requires very little download time compared to graphic
text. HTML text can also be updated more easily than graphic text.
- Make graphic elements individual links - while his effect can
be achieved with image maps, usually separate graphics for each link
is better: better compatibility when the page is viewed without graphics
(using the ALT text), better accessibility for the disabled, the ability
to have rollovers for the links, and simpler updating of the page.
- Rollovers - rollover images can be created for each navigational
element on the page which would not be possible if the page was one
large image.
|
|
| |
Page slicing can create numerous problems if the designer is not careful:
- Page size - by letting a program create all of your images,
it is easy to let the page size grow too large. Be vigilant about
the total page size when image slicing!
- Page complexity - image slicing programs can create a large
number of cells in the page. If this happens, the browser will take
longer to display the page, and the user feels it is taking longer to
download. Keep the number of slices to a minimum so the page is not
too complex.
- More complex design process - image slicing creates a more
complex process, and may add to the time it takes to develop a web site.
In particular, it make take longer to make changes to pages developed
with slicing.
- Page payout - If you have a lot of live text in a page, it
may cause the slices to change shape and break the layout. The best
approach in this case may be to create the page's individual slices
in the slicing program, but do the page layout in Dreamweaver.
|
|
| |
Be methodical. Creating the numerous image slices for a web page
makes the designer's job potentially very complicated. One has to keep
track of the page layout, the precise dimensions of each graphic element,
rollover highlights, etc. If any changes are made to the page after it's
initially constructed, these factors become even more acute. As a consequence,
the designer must take a very organized and careful approach to developing
web page graphics. Here is one method:
- Do the initial design and layout in Photoshop
- Test the design in a web site by exporting a JPEG version of the entire
page and use an image map for any links on the page
- Based on the tests, revise the design in Photoshop and create a final
comp
- Create rollover highlights as separate layers
- Determine how the page will be sliced up to:
- compress each section of the image most efficiently (with
JPEG or GIF)
- make slices for each rollover
- Create the image slices using the minimum number of rectangles
for dividing the page. Try to keep the total number of slices under
15. It is better to have fewer, larger slices than many small slices.
- Set the image format for each slice (JPEG, GIF, level of compression,
etc.)
- Set the transparency for the slice, and set the matte color
- Associate URLs with any slices that are links (in the Slice palette)
- Create the rollovers for the appropriate slices (in the Rollover
palette). Set the layers on and off for the "over" state
for each rollover, being sure that only the necessary layers are
affected.
- Export all the slices along with an HTML page (Photoshop automatically
creates a table that arranges the slices properly on the page). Save the image slices in a separate folder for each web page.
- Modify the generated HTML in Dreamweaver to finalize the
page
|
|
|
|
|
|
| |
| |
An image is created
and edited, then
the user can create image slices, animations, and even make changes to
the image itself with the Photoshop editing tools.
Open the Photoshop file:
- Choose VIEW> RULERS, and create any guides you may need to
make your slices consistent
- Choose FILE>FILE INFO... and set the page title
- Choose BACKGROUND COLOR Pallette... to set the image background
color or image
- Select
the slice tool
- Draw a slice by clicking and dragging to create a rectangle for your
slice
- In the optimize palette, set the appropriate image coding for
this slice. Don't forget transparency and matte if they are appropriate.
Use the slice select tool (the alternate for the slice tool)
to select different slices.
- By right-cliking the slice, set the following attributes for the
following sections:
- Type: select whether there should be a graphic or not in
this slice
- Name: set the name of the file to be created for this slice
(Photoshop creates a default file name, which you can use)
- URL: if this slice is to be a link, put the web page or
site to be linked to
- Target: Used in tandem with URL (and normally empty), this
section can be used to open the link in a different window or frame
- BG: Sets the background color for this table cell
- Message: Creates a small JavaScript to show a message in
the status area at the bottom of the browser
- Alt: Used for the ALT text
|
|
| |
To make rollovers, you create the highlighted version of
a rollover in a separate layer, in the same place as the un-highlighted
section of the main image. Once you've done this, follow these instructions
to create the rollover:
- Select the slice you want to work on
- Click on the Rollover tab in the slice palette
- Initially, there will only be a "Normal" frame shown
- To create the "Over" frame, click on the "new"
icon at the bottom of the palette (the one that looks like a piece of
paper with the edge folded up)
- With the Over frame selected, turn on and off any layers you want
for the rollover. Normally, you should only turn layers on and off
that have pixels inside the area of the slice. If you want the rollover
for this slice to affect other slices, then you can turn on/off layers
that have pixels outside of the slice, and Photoshop will turn on/off
other slices when the current slice is rolled over. But be aware that
it will take extra time to download the extra Over slice images for
the other affected slices. It is easy to create many extra slice images
if you are not careful about the layers you turn on and off for rollovers.
- Be very careful to only to make changes to your layers when the rollover
frame is selected in the rollover palette--not when the normal frame
is selected. Otherwise, you will see very strange effects where slices
seem to turn on and off at random when you rollover.
- To preview what your rollovers will look like, turn on SLICES>PREVIEW
ROLLOVERS
|
|
| |
When you are ready to save your sliced images, you can create image files
only, or create an HTML file with all of the images inserted in a table
in the correct layout. This second option will also put in any JavaScript
for rollovers. When saving, be sure to set the following items:
- Create HTML or not
- The directory for the images
Note that image slicing often generates many images. In general, it's
recommended that you create separate image directories for each sliced
page so you can keep track of the images better. For example, for the
products.html page, put the images in a directory called products_images;
for about_us.html page, put the images in a directory called about_us_images;
etc. Set the image directory by selecting the OUTPUT SETTINGS...SAVING
FILES in the Save Optimized dialog.
There are many other options, especially for the naming of the images.
You can access these options FILE>OUTPUT SETTINGS or from the OUTPUT
SETTINGS... in the Save Optimized dialog.
It's best to always use Save Optimized As... (rather than the simpler
Save Optimized) when saving the sliced page. This is because you may use
the same Photoshop file to generate several different web pages, and you
will need to change the name of the HTML file and the image directory
for each web page. By using the "As..." version, you will always
have the option of making these settings.
|
|
| |
From scratch, slice a Photoshop file:
Keep the following in mind as you slice this image:
- Set the page title and background color
- Slice neatly!
- make a minimum number of slices
- match up the edges of slices to produce the simplest table
- don't leave any spaces between slices
- Set blank slices to no_image
- Set the optimization for each slice
- Set the matte for each slice
- Hide the background layer so the slices can have transparency
- Make the rollovers, being careful to turn layers on and off appropriately
- Set the URLs and ALTs for each slice that's a link
- Make the animation
- Export the HTML and sliced images
|
|
| |
Slice efficiently. It's very easy to generate a large number
of files in Photoshop when slicing. To prevent this, follow these guidelines:
- Wherever possible, set your slices to "No Image" so that
Photoshop does not generate an image for that slice. Do this by selecting
the SLICE palette, and setting the "type" to No Image. "No
image" slices will be empty, and the background color of the page
will show through.
- Layout your slices so that the page will have the minimum number of
slices. Some techniques for doing this are:
- Match up the edges of as many slices as possible, even if it makes
your slices a little larger. This will eliminate extra slices used
to create small tables to position each individual slice.
- Only slice areas that need to be rollovers or links. Otherwise,
combine slices (SLICES>COMBINE SLICES) and make your slices as
large as possible.
- Use rollovers sparingly. They generate extra files
- Make sure the layers you change for a rollover only affect that
slice. Otherwise, you will generate rollovers for other slices that
change with those layers.
Use transparency to avoid seams. It is best to knockout the background
of a slice where possible (i.e. when it's the color of the background
of the web page). By creating a mask and using the MATTE setting of the
OPTIMIZE palette, the slice's background will be made transparent and
the rectangular edges of the slice will be invisible. Otherwise, the seams
of the slices may be visible due to different levels of compression for
adjacent slices.
Use separate image directories for each web page. Sliced pages
often have many images, and the pages are frequently regenerated with
different slices. This process can leave many unused "orphaned"
images that should be deleted. If several sliced pages have their images
saved in the same directory, it is difficult to find the orphaned image
slices. On the other hand, if the image slices are saved in a separate
directory for each sliced web page, then after significant changes to
the slicing, the entire directory can be deleted and a new set of images
can be optimized and saved into a clean directory.
Live text in a slice. If you want to make a slice that will have
live HTML text, set the slice type to NO_IMAGE, and then put some text
in the TEXT field in the slice palette. Once you do these steps, you can
put different or more text in the slice cell once you edit the file in
Dreamweaver.
Updating individual slices. It is common to make changes to the
graphics or compression in an individual slice in a page. For example,
changing how an individual rollover looks. Rather than resaving all the
page slices and HTML, it is more efficient to just save the individual
slice, leaving the HTML and the rest of the page untouched. To do this:
- select the modified slice(s) with the slice select tool
- select FILE>SAVE OPTIMIZED AS...
- set SAVE AS TYPE to IMAGES ONLY
- change ALL SLICES to SELECTED SLICES
- make sure you are saving into the actual directory where the slice
graphic is located (typically an images directory)
- SAVE
Animated GIFs. (See below) Contrary to what it might seem, Photoshop is designed
to only make one animation per file. So if you want several
animations on a page, you'll have to make them separately and compose
them together in Dreamweaver.
Another problem is that if you have one slice that's
an animated GIF, with rollovers elsewhere on the page, the animated GIF
will STOP when you cursor over any rollover. To solve this:
- Set up the slices completely on the page
- Set up the animation for one slice
- Set the animation slice to NO IMAGE
- FILE>SAVE OPTIMIZED AS to save the whole page
- Select the animated slice, and set the animation slice to IMAGE in
the animation palette
- FILE>SAVE OPTIMIZED AS save the animated slice only:
- set SAVE AS TYPE to IMAGES ONLY
- change ALL SLICES to SELECTED SLICES
- make sure you are saving into the actual directory where the slice
graphic is located (typically an images directory)
- This will save the animation slice only, and not change the HTML file
you previously produced
- Open the HTML in Dreamweaver and replace the blank image where the
animation goes with the actual animation GIF.
|
|

|
|


Animated GIFs are graphic files composed of a series of frames in the
GIF89a format. They have the following characteristics:
- They can have a transparent background. This is accomplished by designating
one color to be the transparent color.
- They can play once, play a specified number of times, or play forever
- They have a frame rate specified when they are made. Some applications
allow a different frame rate to be set for each individual frame.
- They can be optimized so that only the moving objects are changed
from frame to frame, rather than repeating the entire scene.
|
|
| |
A number of applications are available to create and edit animated GIFs.
|
|
| |
To make animations in Photoshop, you create the different frames of
the animation in separate layers, overlaid in the same location of the
file. Once you've done this, follow these instructions to create
the animation:
- Select the slice where there will be an animation (or the whole image
if that's what you are animating)
- Select the Animation palette
- Initially, there will only be one frame
- To create additional frames, click on the "new" icon at
the bottom of the palette (use the trash can to delete frames)
- Select each frame and turn on and off the appropriate layers for that
frame
- Select the timing for each frame by pulling down the timing menu directly
under the thumbnail
- Select the loop setting by pulling down the menu in the lower left
of the palette (Forever, Once, Other)
- To copy and paste frames, DO NOT use control-c or control-v (they
don't work right). Select the desired frame, and select copy or paste
frame from the options pullout
- To optimize the size of the GIF animation, select Optimize Animation
from the options pullout.
- Preview your animation by using the play controls at the bottom of
the palette.
- To automatically create in between frames in an animation, use the
Tween feature. The tweening only works with changes in
the position of a layer between two frames. For example, you might have
the "GIF" text on the left in one frame, and use the move
tool to change the position of the "GIF" in the other frame. To create tweens between frames, select the two adjacent frames you
want tweened. Then click on the options pullout menu in the upper right
hand corner of the palette. Select "Tween...", and then set
the number of frames to be added.
- Don't forget to set the image compression in the optimize palette. You must use the GIF format, since JPEGs cannot be animated.
Be sure to check
every frame for quality.
- To save out the GIF animation, select FILE>SAVE OPTIMIZED and set
the location to save your animation.
Note: The animated_gif_example.gif file is organized in layers so that
the GIF1, 2, 3... layers match the bars1, 2, 3... layers. So for frame
1, turn on the following layers:
- Animated (a text layer)
- GIF1
- bars1
|
|
| |
create a gif animation using Photoshop. For example, make a ball bounce
or a butterfly move around.
- create a least 4 different frames
- experiment with tweening
- note the size of the resulting animation
- export the animation, and import it into a web page
|
|
- Photoshop: slicing, animation - Online help files & video tutorials
|